MADJAK's NA8 - 200+HP N/A

Chat to do with your MX5/Miata/Eunos Garage Ride(s).

Moderators: timk, Stu, zombie, Andrew, The American, Lokiel, -alex, miata, StanTheMan, greenMachine, ManiacLachy, Daffy

madjak
Racing Driver
Posts: 1117
Joined: Tue Dec 31, 2013 12:11 pm
Vehicle: NA6

MADJAK's NA8 - 200+HP N/A

Postby madjak » Tue Jun 09, 2015 3:15 pm

I figured I'd start a build thread to document all the various mods to my car, most of which are custom. I get a lot of questions and it would be easier to point them at this thread. There are snippets of my build around the forum already but over the next few days I'll bring it all together into one thread and then continue it as the car develops further.

This photo was taken of the car last week down at the Albany sprints.
Image

For a bit of background... this journey started as my daily back in 2004 as an imported NA6 stage1 B-Spec (#144) Eunos Roadster. It was a great little car but as my family grew the car got parked up for 4-5 years and only dríven occasionally as a weekend car. At the end of 2013 I figured it was time to get into a bit of motorsport so I dusted off the car, gave it a paint, added a racing seat, harness, extinguisher and new pads and it was off to the racetrack for a bit of fun. Since then I've been tracking the car in both the local speed series as well as some MX5 club events. Every time I worked on the car something came off and was left off so the car has been slowly stripped and lightened as I went.

The biggest change was in August 2014 when I purchased a secondhand NA8 ex-race engine from QLD and transplanted out the 1.6. Since then the car has been slowly developed into a full track / sprint car.

The main items I'll post here will be the major upgrades to the car:
    Half-width Honda Radiator & cooling system
    3" Aluminium Exhaust
    11.75" Wilwood Rotors and calipers (front) 11.44" Wilwood rotors (rear)
    DIY - Splitter
    DIY - 3D Printed Rear Wing
    Custom Intake Manifold
    E85 Fuel System

There are lots of other minor mods but I think I'll skip these are mostly covered elsewhere.

My Engine Bay:
Image
NA8: N/A 200whp | Haltech | Skunk2 Intake | S90 TB | RCP | 5 speed c/r dogbox | 4.78 diff | AST Shocks
Barbs L: 64.12 | S: 58.62 | Collie: 49.72

madjak
Racing Driver
Posts: 1117
Joined: Tue Dec 31, 2013 12:11 pm
Vehicle: NA6

Re: MADJAK's NA8 - 200+HP N/A

Postby madjak » Tue Jun 09, 2015 3:26 pm

Honda Radiator

This one I get heaps of questions about. When I did this I wasn't really thinking about cooling and just purchased the Honda radiator from ASI because it was cheap ($140) and looked shiny. Later I realised that lots of MX5s have cooling issues and most people install full width race radiators. My theory was that I had no issues with the thin OEM radiator even with one fan not working, so a thicker smaller radiator should be fine right? Also later I could box in the other half and create an cold air dam for the intake (yet to be done) or put an intercooler in there when I get more serious.

Before I go on about the radiator, my engine has a coolant re-route and no heater. So this means the bottom mixing manifold is welded up and just accepts the bottom return from the radiator. The front thermostat housing is completely removed and blocked off and at the rear of the engine I have a coolant housing from another mazda (I think a 323) that points the output to the exhaust side. I have a home bent (don't look underneath) 32mm ally tube running past the top of the head to the radiator. Thats it! No thermostat, just coolant running around in a 32mm pipe with a couple of sensors (one for the Gauge and one for the ECU).

You can see the re-route in the photo of my engine bay above.

The radiator itself sits on a custom bracket that bolts to the sides of the chassis rails and uses some of the same bolt holes as the sway bar mounts as well as a few nutserts drilled into the chassis. The existing OEM radiator mounts were removed.

Image

This bracket is made from a Bunnings 50x30mm RHS tube with two waterjet hangers that were waterjet cut from 6mm ally. These are welded on to the RHS and then mounting tabs that I cut from one end of the RHS are also welded on to mount the radiator and oil cooler. I then blocked in the bottom, top and one side of the radiator with 1.5mm ally sheet all the way to the front mouth of the bumper. Later I also used this hanger to mount my splitter. Currently one side of the mouth is totally open to the engine bay.

I have also removed the OEM overflow tank and mounted a Moroso coolant tank on the passenger side chassis rail. This seems to work fine with the overflow from the radiator (pressure cap still installed) going to the bottom of the overflow tank. This tank also has a pressure cap as it sits below the fill point for the radiator. My theory here is that the radiator will expand excess air into the overflow when hot and then suck in coolant when cold... same as the stock one but sealed. With this setup I struggle to fill the coolant line over the top of the engine. To get most of the air out, I jack the front of the car as high as possible and fill it... it's a bit awkward but works.

You can see how small the radiator is in this photo, also where the overflow sits on the chassis rail:
Image

The engine runs cool even on 35degree days... after 5 hot laps at Barbagallo the logs show a max temp of around 95 degrees. I find idling the car for around 5-10mins gets the oil and coolant up to temp suitable for hillclimb and sprint events. I don't cruise with this setup so I can't report if the engine gets too cold without a thermostat. Also I'm running an oil cooler which will help keep the engine cool on a track.

Here is the link to the CAD profile of the hanger brackets: https://lastpixel.box.com/s/nza2qc5qpsk66jcta7matj3pryc6agfs

I'll post some more photos from underneath the car tonight.
NA8: N/A 200whp | Haltech | Skunk2 Intake | S90 TB | RCP | 5 speed c/r dogbox | 4.78 diff | AST Shocks
Barbs L: 64.12 | S: 58.62 | Collie: 49.72

Apu
Speed Racer
Posts: 2399
Joined: Tue Apr 12, 2011 3:04 pm
Vehicle: NB8B
Location: North West, NSW

Re: MADJAK's NA8 - 200+HP N/A

Postby Apu » Tue Jun 09, 2015 3:38 pm

Ooooh! DIY splitter! Care to share?

What did you make it out of; how did you fasten it to the chassis, etc?

Many thanks in advance!

madjak
Racing Driver
Posts: 1117
Joined: Tue Dec 31, 2013 12:11 pm
Vehicle: NA6

Re: MADJAK's NA8 - 200+HP N/A

Postby madjak » Tue Jun 09, 2015 4:52 pm

Apu wrote:Ooooh! DIY splitter! Care to share?

What did you make it out of; how did you fasten it to the chassis, etc?

Many thanks in advance!


I was going to post this tomorrow, but I figured I could write it up in my lunch hour.

Splitter

This is a real DIY splitter that's very cheap but works well. I used to run a rally car that had a heavy sump guard that could be removed very easily so I used the mounting point design from that. The idea is that I can remove the splitter without jacking the car but it needs to be very firmly mounted to act a bit like a bash guard.

The splitter is made from 12mm ply and painted black. This means the splitter material itself is only $40 and can be cut with a jigsaw. If I damage it I can just make an new one in 20 mins.

The front design is based off the GV r-package splitter which has an interesting shape. It also doesn't protrude further forwards than part of the front nose which is a requirement in some classes.

Mounting wise the splitter engages into two 'mushroom' pins that are fixed to the subframe. The front is held up by only 3 bolts into my radiator hanger with two supports picking up the very front. This means to detach the splitter I just have to undo three bolts plus the two front supports and the whole thing slides out. It also means that any front impact force will transfer into the two pins in the subframe at the rear. Any vertical impact will go into the same rear pins as well as into the collapsible mounting points off my radiator bracket. This is all to stop any minor impact destroying my radiator supports.

Here are the two mouting pins with large spacers that are mounted to the subframe either side of the sump. Slots in the back of the splitter key into these.
Image
Image

Holding up the front are three collapsible hangers mounted from my custom radiator bracket. I have also fixed some lightweight support ribs to the back of the splitter to make it a bit more rigid. These are 15 x 7.5mm ally RHS from Bunnings that I've milled holes into. Bit tedious but very satisfying when you see the end result. Someone needs to sell pre-drilled tube!
Image

I also have two hangers at the front to help hold up the front lip.
Image

All up it I think it works well and looks good. It's nice and light but very strong. I've chipped it a few times getting the car on and off the trailer and some of the timber at the back has warped due to water. I think a marine ply of some sort would probably be more durable and more weather proof but it's also heavier. This one was lasted pretty well and I'll probably just remake a new one if this one degrades too much maybe with some sort of sealer on it to stop water damage. The next one I make will be a bit wider to blend into some 3D printed canyards each side. This should stop the airstream from hitting the front of the tyre.
NA8: N/A 200whp | Haltech | Skunk2 Intake | S90 TB | RCP | 5 speed c/r dogbox | 4.78 diff | AST Shocks
Barbs L: 64.12 | S: 58.62 | Collie: 49.72

Apu
Speed Racer
Posts: 2399
Joined: Tue Apr 12, 2011 3:04 pm
Vehicle: NB8B
Location: North West, NSW

Re: MADJAK's NA8 - 200+HP N/A

Postby Apu » Tue Jun 09, 2015 5:24 pm

Thanks very much! The kit I have on my Integra uses 8mm ply and doesn't need supports in the front. I'm sure it flexes, but works fine. They've found that 10cm protrusion is more than enough...unless you go silly Time Attack speeds.

I'll take some pics when I get some time, and post them on my garage thread. It's off the car at the moment.

madjak
Racing Driver
Posts: 1117
Joined: Tue Dec 31, 2013 12:11 pm
Vehicle: NA6

Re: MADJAK's NA8 - 200+HP N/A

Postby madjak » Tue Jun 09, 2015 5:37 pm

Apu wrote:Thanks very much! The kit I have on my Integra uses 8mm ply and doesn't need supports in the front. I'm sure it flexes, but works fine. They've found that 10cm protrusion is more than enough...unless you go silly Time Attack speeds.

I'll take some pics when I get some time, and post them on my garage thread. It's off the car at the moment.


My understanding is an effective splitter should generate around 80kgs of downforce across the top surface of that front lip. So if you can't stand on it then it's not strong enough. I initially didn't have the front supports but when I put load on it the front lip flexed down a bit. I certainly didn't feel comfortable standing on it!

Splitters and front canyards are great because not only do they generate downforce, they can also reduce drag... which is a win - win. Most other aero will slow the car down with drag but you need it if you have lots of front downforce.
NA8: N/A 200whp | Haltech | Skunk2 Intake | S90 TB | RCP | 5 speed c/r dogbox | 4.78 diff | AST Shocks
Barbs L: 64.12 | S: 58.62 | Collie: 49.72

Apu
Speed Racer
Posts: 2399
Joined: Tue Apr 12, 2011 3:04 pm
Vehicle: NB8B
Location: North West, NSW

Re: MADJAK's NA8 - 200+HP N/A

Postby Apu » Tue Jun 09, 2015 6:04 pm

Correct, but 80kg spread across a whole sheet vs 80kg in one spot is not quite the same thing.

In any case, looks like I'll be going to 10mm monopan.

User avatar
zero00
Speed Racer
Posts: 3248
Joined: Mon Apr 12, 2010 6:54 pm
Vehicle: NB8A
Location: Sunshine Coast Queensland

Re: MADJAK's NA8 - 200+HP N/A

Postby zero00 » Tue Jun 09, 2015 7:21 pm

Nice to see the B-Spec tag is still attached - MS11-20144 :wink:
Roger D-SUNSHINE COAST
2000 NB8A-LP 69.1248|QR Clubman 71.9235|QR Sprint 68.1412
1989 NA6 B-SPEC #77|Toyota GTS86 MT

madjak
Racing Driver
Posts: 1117
Joined: Tue Dec 31, 2013 12:11 pm
Vehicle: NA6

Re: MADJAK's NA8 - 200+HP N/A

Postby madjak » Tue Jun 09, 2015 7:37 pm

zero00 wrote:Nice to see the B-Spec tag is still attached - MS11-20144 :wink:


It's moving off this car and onto an identical chassis that has all the B-spec running gear in it. I couldn't bare to split up all the gear so I've rebuilt another from the same year Eunos Roadster! I've been driving it a bit and I love the 1.6 b-spec... such a fun car around town because it's so rev happy and light. It's up for sale now if anyone is interested.
NA8: N/A 200whp | Haltech | Skunk2 Intake | S90 TB | RCP | 5 speed c/r dogbox | 4.78 diff | AST Shocks
Barbs L: 64.12 | S: 58.62 | Collie: 49.72

User avatar
zero00
Speed Racer
Posts: 3248
Joined: Mon Apr 12, 2010 6:54 pm
Vehicle: NB8A
Location: Sunshine Coast Queensland

Re: MADJAK's NA8 - 200+HP N/A

Postby zero00 » Tue Jun 09, 2015 8:37 pm

madjak wrote:
zero00 wrote:Nice to see the B-Spec tag is still attached - MS11-20144 :wink:


It's moving off this car and onto an identical chassis that has all the B-spec running gear in it. I couldn't bare to split up all the gear so I've rebuilt another from the same year Eunos Roadster! I've been driving it a bit and I love the 1.6 b-spec... such a fun car around town because it's so rev happy and light. It's up for sale now if anyone is interested.


You hit the nail right on the head! 'rev happy' - pleasure to drive and I had mine on the track a few weeks ago, just 'breakfast/happy laps' at 'restricted' speed as the morning is designed to acquaint people with what it's actually like to drive on a track - was a good chance to test cornering/braking/etc and also acceleration down the main straight - very popular here with Car Clubs at both Lakeside & QR :wink:
Roger D-SUNSHINE COAST
2000 NB8A-LP 69.1248|QR Clubman 71.9235|QR Sprint 68.1412
1989 NA6 B-SPEC #77|Toyota GTS86 MT

User avatar
beavis
Forum sponsor
Posts: 1405
Joined: Mon Feb 02, 2009 12:31 pm
Vehicle: NB8B - Turbo
Location: Melbourne

Re: MADJAK's NA8 - 200+HP N/A

Postby beavis » Tue Jun 09, 2015 9:22 pm

Just posting to say, please post more things, this is interesting.
Turbo NB Build Thread | BeavisMotorsport.com | YouTube.com/bbeavis | Cars: NA6, NA8-VVT, NB-Turbo, ND-2L

Apu
Speed Racer
Posts: 2399
Joined: Tue Apr 12, 2011 3:04 pm
Vehicle: NB8B
Location: North West, NSW

Re: MADJAK's NA8 - 200+HP N/A

Postby Apu » Tue Jun 09, 2015 10:14 pm

Totally agree with beavis. I love to read threads where guys are building their own stuff rather than just buying JDMYo! stuff.

...I have none of the skills, so just get people to build for me :oops:

User avatar
plohl
Racing Driver
Posts: 1922
Joined: Wed Oct 14, 2009 12:13 am
Vehicle: NA8
Location: Brisbane

Re: MADJAK's NA8 - 200+HP N/A

Postby plohl » Wed Jun 10, 2015 9:33 am

beavis wrote:Just posting to say, please post more things, this is interesting.


+1

Sent from my SM-N9005 using Tapatalk
Cheers,
plohl

madjak
Racing Driver
Posts: 1117
Joined: Tue Dec 31, 2013 12:11 pm
Vehicle: NA6

Re: MADJAK's NA8 - 200+HP N/A

Postby madjak » Wed Jun 10, 2015 2:06 pm

Brakes

So the first season I raced my NA6 I used DBA slotted front rotors and stock rear rotors with a proportioning valve (full open). I had race pads in the front, Ferodo DS3000 and semi street pads in the rear.

I was amazed at how well the car pulled up on the tiny rotors. My brake points and control were awesome but only when the brakes were at temp. When the pads were cold I'd get front lockups constantly. The main issue with the little rotors was pad and rotor wear. I chewed through a set of pads and a set of rotors in less than a year. On the track I could see the rotors getting thinner between sessions and at night it was fireworks! You could even see the rotors glowing in the braking zones. I didn't experiment with ducting but I suspect with good cooling and maybe slightly less aggressive pads the stock setup could be made to last longer but still retain the excellent brakes.

For anyone with a NA6, if you can deal with rotor and pad replacement the stock NA6 brakes are excellent in track scenarios.

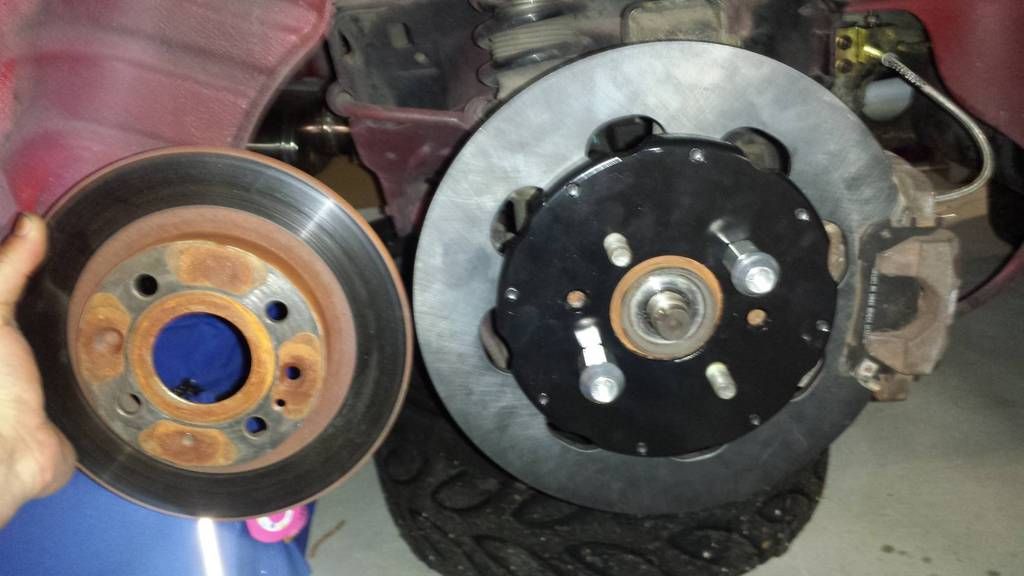
BUT, I do mostly sprint / time attack events where I'm driving on cold brakes... the stock brakes with race pads were completely useless in this environment. I also didn't want to spend $300 replacing pads and $250 replacing rotors each year. Some internetting later I found my target rotor which was the 11.75" wilwood. This rotor is a two piece with a very cost effective replacement friction surface $35 per ring. The problem with this sized rotor is fitting it inside a 15" rim. More internnetting found the dynopro radial mount caliper which has a slimmer profile than the standard dynalite. So here is my setup:

Fronts:
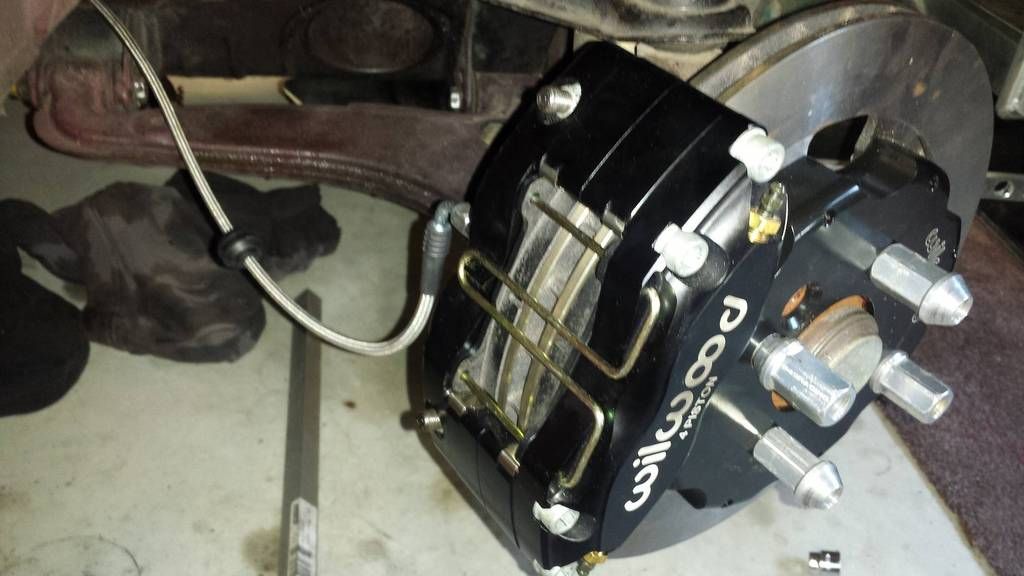
11.75" Wilwood vented rotor with 4 pot radial mount Dynapro calipers.

Image

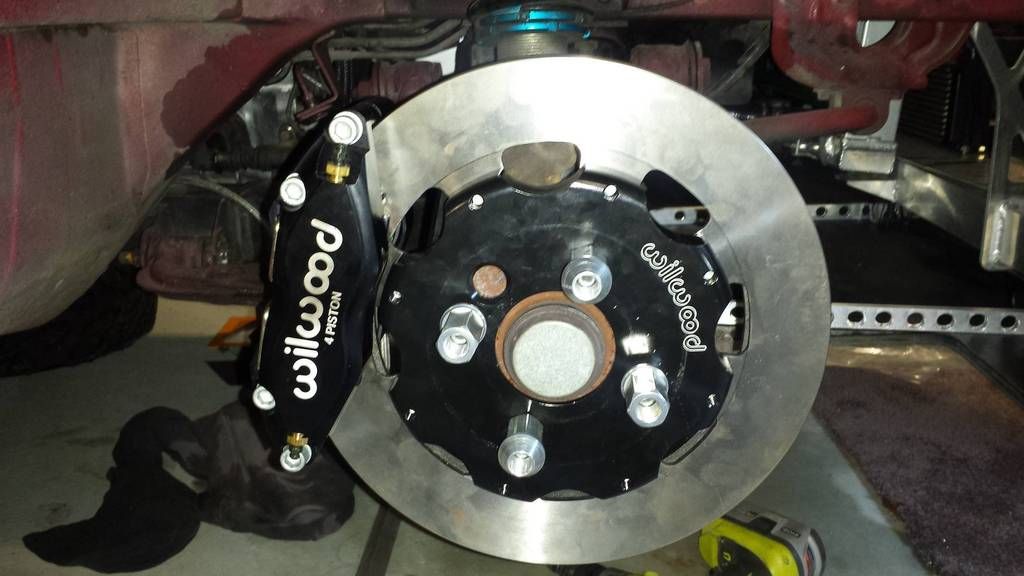
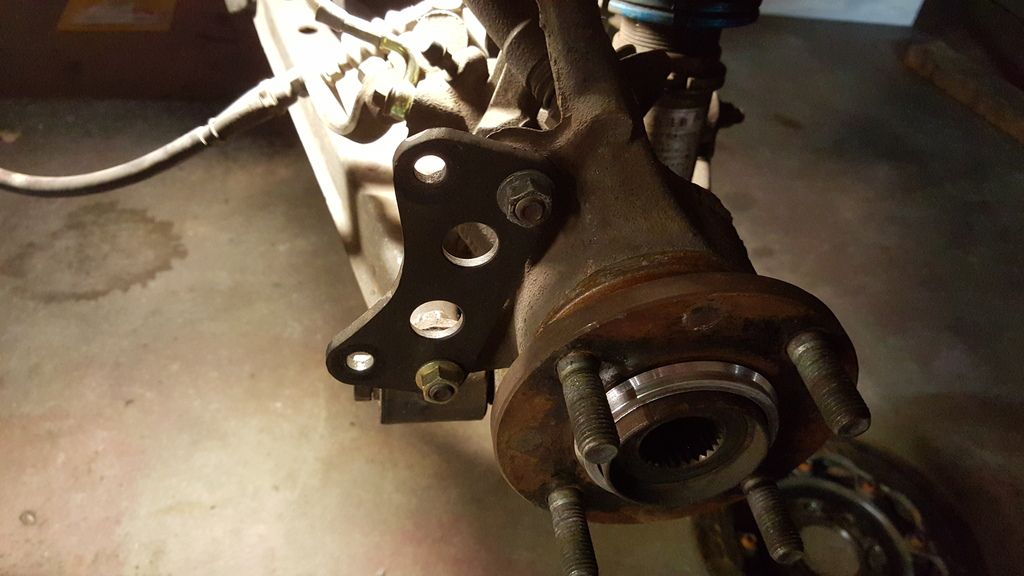
Now the issue is Wilwood don't make the correct offset brackets for these calipers to work with the MX5 spindles. There happens to be a kit for the Newer Mini Cooper S that is the exact combination of rotors, calipers and brackets, but you need to make some custom spaces, extend some of the mounting studs and find the correct hub centric rings. This is fairly well documented by Bundy on Miataturbo.net. The process wasn't hard but a little time consuming.

Image

To balance this much brake I had to upsize the rear.

Rear:
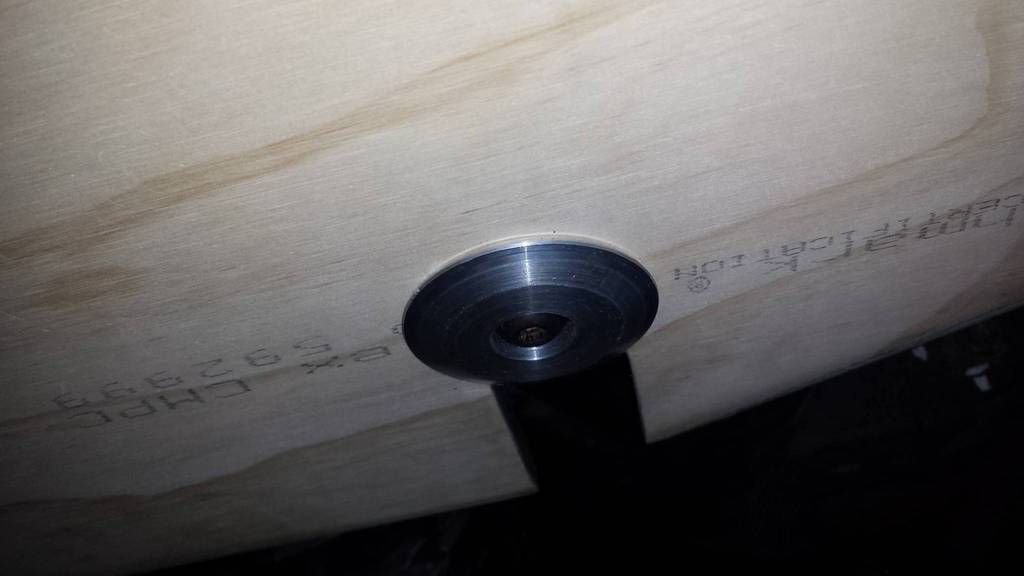
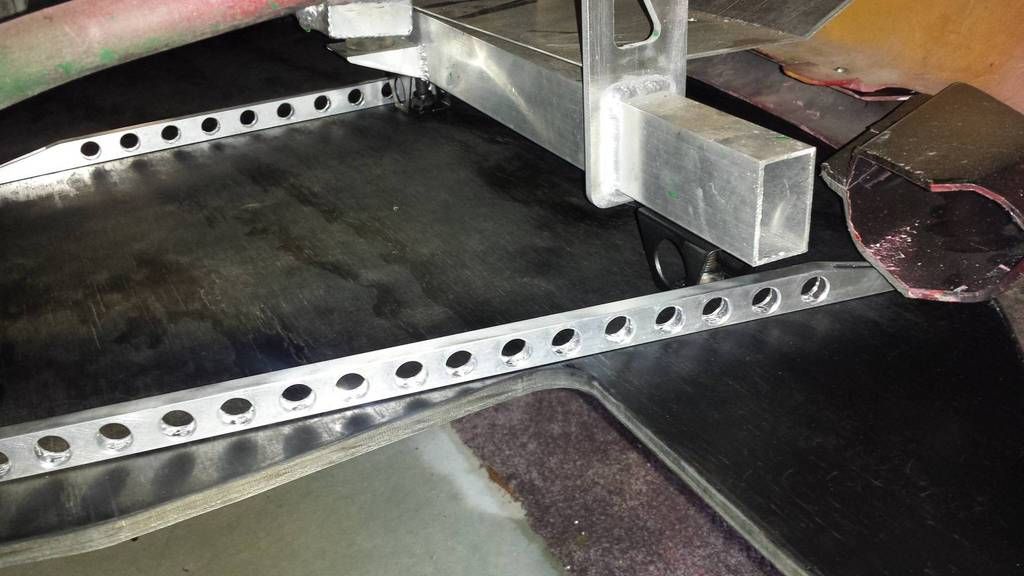
11.44" Wilwood solid rotor with stock NA6 caliper. (based on a Honda rotor kit)

Image

This is a really good solution for anyone wanting more rear brake. It uses the stock caliper just offset by a metal bracket that I made myself. This is just a 6mm metal plate that I hacksawed and drilled that offsets the caliper both away from the spindle by 38mm and outwards by 6mm. With the Honda Wilwood hat and rotor this places it dead center in the right spot.

With the stock brakes I could never get enough rear brake. It was probably the street pad in the rear as well as piston sizing / rotor diameter. With this wilwood, I'm having to dial my proportioning valve back a bit to stop the rear squirming under brakes. I think this has moved my braking point a little later, but not by a massive amount. When I first ran the car I was braking at my standard points but washing off too much speed through the corner. It took me a while to adjust.

Here is the bracket:
Image

Why this big on a N/A car?... well really rotor size affects the leverage of the brakes vs the wheel. So the larger the rotor diameter the less the pad has to work. The other benefit is more surface area that the pads are working on so wear level is less and heat is less. I've also never subscribed to the theory that more powerful cars need bigger brakes. Sure they probably work them a bit more, but there are times when I'm stopping from 180 kph down to 60 in 50 meters... Really brake size is more dependent on the tyre your using and mass your stopping and has less to do with power.

The pads I'm using now are simply unreal. Unfortunately they require lots of effort to fit into the calipers. Based on the mixture of events I've gone with some hi-tech silicon based endurance pads. Ferodo DS1.11

Here is the temperature to friction co-efficient graph:
Image

You can see why I'm using this pad... it offers almost constant braking friction independent of temp. So when cold these brakes stop as good as the 4th lap on the track. I had to manually hacksaw and grind the pads to fit both the Wilwood Dynapro as well as the stock NA6 rear calipers. The fronts were easy with only a minor mod but the rears required much more effort...

Overall I'm extremely happy with the end result. Braking is not an issue and I can focus on getting the braking point as late as possible and turn in right. I don't think my braking point has moved at all on the track, maybe a few meters later but I have a lot more confidence on the hillclimb and sprint events. Rotor and pad wear has been massively reduced, so much that I think they will pay for themselves within a few years.

Next stage is to add ducting to the front brakes to keep them cooler.
NA8: N/A 200whp | Haltech | Skunk2 Intake | S90 TB | RCP | 5 speed c/r dogbox | 4.78 diff | AST Shocks
Barbs L: 64.12 | S: 58.62 | Collie: 49.72

User avatar
plohl
Racing Driver
Posts: 1922
Joined: Wed Oct 14, 2009 12:13 am
Vehicle: NA8
Location: Brisbane

Re: MADJAK's NA8 - 200+HP N/A

Postby plohl » Thu Jun 11, 2015 7:36 am

That's a pretty simple brake upgrade for the rear! Do you know what the honda hat part number is?

Also - getting 2 pairs of your radiator mounts cut this week - THANKS! :D
Cheers,
plohl


Return to “MX5 Garage Chat”

Who is online

Users browsing this forum: Google [Bot] and 21 guests